Posts

Only 2 more posts left ?

Image
So now I am getting pretty happy with the ghost. I changed the wheels, changed the trim to aluminum, and added the side trim. I am sure I will make a few more tweaks here and there, but this is pretty much complete.  The Ghost with the new trim. Also went back to the mag wheels. The door is on the right side so you can enter onto the sidewalk side instead of the traffic side. Street legal and insured! I might make a few changes over the winter to the drive train to clean up the chain noise. But that it pretty much it. I think I am coming to an end of this blog. But there are two more posts I have planned. One will be the lessons learned; both in design and in project management. The last one will likely be in the same vain, but what the next version might look like. Assuming there is a next version.

99 and 44/100th percent done?

Image
Finally done after all these years! The retro look is in: Front (above), Side (below) I had mixed feeling about being done. The more I thought about it, the more I knew that something was wrong. What really bothered me was that I could not quite put my finger on the problem. It is the side that really seems off. I just do not like the vertical line between the aluminum front and the wood side panels. So I pulled a photo into "paint" and tried some ideas. It looks like I can fix it up fairly easily. Idea (so far): Just that little piece, to blend the front to the side, seems to do wonders. In additon, there is a black plastic cap between the interior and exterior that I will change to aluminum. With a little luck these small changes can be done in a reasonable amount of time. If history is any lesson it will be a while :-(  ! If you have any ideas, please download a photo and try it out in your favorit photo editor. I am open to suggestions!

Body and Interior

Image
The interior panels came out pretty well. At least I am happy with them! They are simple black and functional. The body panels have been complete for some time. But they need sanding and a final clear coat. Above I am working on the door-side panel. Since the seating is tandem, I decided to put the door on what is traditionally the passanger side. This way I enter and exit on the sidewalk side instead of into trafic. Every year it gets harder and harder to work in a cold garage. So I insulated the garage doors and had A+A Heating put in a wall mount heater. Notice I am wearing a t-shirt? Best money I ever spendt! Thanks Paul! I also replaced the leaky brake line. So once the exterior is done being sanded I'll have to get them clear coated and have a cap made to go between the interior and exterior. Getting closer!

The little things

Image
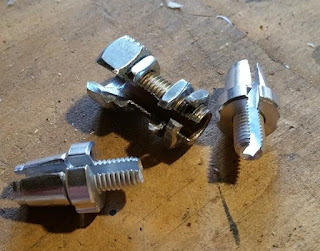
I think it is kind of funny how most of the time I have spent on this is figuring out how I can use what is available (junk yard, on line, make easily, local hardware store, etc.) to do what I want. There used to be a machinist in town who would do small jobs. Even though he was expensive, it was still way cheaper than buying a lathe and milling machine. Plus they came out better with a professional at the helm. But he is no longer in town. I was surprised how important a parking brake is. Adjusting the parking brake is equally important!   Above is a photo of two "barrel adjusters" for bicycle cable brakes and one I made for the parking brake adjust. The brake cable for the parking brake is huge! Even bigger than a motorcycle cable. So I had to make my own barrel adjuster. Between trips to the motorcycle shop, automotive store and hardware store, plus the time to figure out how and what to use out I have to have a few hours into a two dollar part.  All that for what

Q and A

Image
I have had some questions on various parts of the ghost, so I thought I would give some answers. Relay, Main Contactor: For some reason these are open air contactors. The new one is sealed. I do not know why they are called contactors when they are just big relays! These can be completely disassembled with a screwdriver. Normally I wouldn't want to take these apart, but I was having problems and had nothing to loose by attempting a fix. What is odd is that the relay still opened and closed. And even at 500 amps it had near zero voltage across the contacts (after I cleaned it up). There may have been a partial short in the coil that was causing an over current fault. I am told this has been known to happen. Battery Charge Voltage I am using Lithium Iron Phosphate batteries. These are very similar to Lithium Ion, but are much safer with the trade off of lower cost and slightly lower energy density. Because of the different chemistry, they will have a different charge a

Ready for the Body

Looks like I am ready to attach the body now! The batteries appear to be weakening. Perhaps due to age, but the root cause of the weakening seems to have its roots in the fact (OK, more my opinion) that  these batteries are made by a bunch backyard yahoos. Originally they were supposed to be charged to 4.2 volts. Later, evidently after learning this caused reliability problems, they lowered the peak charge voltage. Too late for me. Additionally I have low confidence in the manufacturing standards this company used. In any case, they still work reasonably well, so I have no plans to change them (for now). I am not 100% happy with the chain noise, but someone once said:              "do not let the perfect be the enemy of the good" or something close! The electrical is now flawless! No errors, everything works great! So with a little chain noise, I now have to finish the body panels! (yes, that is a lot of explanation points. I feel like Elaine in an episode of Seinfeld)

Still a little more to do

Cleaning up the master relay (contractor) did not fix the problem. So I wired in a bunch of monitorpoints and ran some more test drives.  The voltage across the relay is very low, and all the drop seems to be coming from the batteries. Nothing looks abnormal, yet the codes persist. I must have not cleaned the master relay good enough. I was originally afraid to take it completely apart, because it seemed like it would not go back together. But with nothing to loose, I took it down to the bare bones.  It looked like one side of the contactor was still having problems. I cleaned everything up again and, to my surprise, it all went back together with no left over parts! It looked like this was the problem, but a test drive showed the same error codes. I went through the electrical system again but still nothing was obviously wrong. Everything pointed to the relay, but the relay did turn on and off and looked good. Plus there was almost no drop across the relay even at 500 amps. I though